Showing posts with label decorating. Show all posts

Sunday, May 6, 2012

Room for a BOY


We had planned for Flynn's "Big Boy Room" to be ready for 2nd Birthday, just as we had done for Lucy. I guess moving Lucy out of the nursery and into a new room was probably motivated by the fact that I was 3 months pregnant with Flynn and so we had a deadline that we really needed to stick to. Unfortunately the second child syndrome was in full swing and his room is now ready for him for his 3rd birthday.
He hasn't been upset about waiting. In fact both of the kids have spent most of this year camping in odd spots around the house and sharing Lucy's room. We have kind of embraced it because we figure that eventually they will be too cool to share or bunk together so if we don't do it now, the chance will disappear never to be enjoyed again.
Part of the reason of the extra wait, was simply because I couldn't settle on a furniture design concept. Or a decorating concept. I find girls rooms are incredibly easy to design and decorate. And most things are easy to adapt across large age brackets. But for boys, things are either too young or too old, or they don't really mingle well. For example: Girls can mix butterflies, fairies and princesses easily. But for boys - cars, super hero's and space themes don't always fit together well.
Plus to really throw a spanner in the works I want my kids' furniture to be able to last them through till at least their late teens. Wall decals and bedspreads are easy to swap out to suit their personalities as they grow but the furniture needs to stay!
So after a bit of too-ing and fro-ing between Hubs and myself, we settled on a slight industrial feel for his bed and furniture. Clint did some magic and Flynn now has an awesome bedroom suite with cool checkerplate features. Truly that man - my hubs - is very good at his trade, and super good looking too! Score for me.
There is storage under the bed so even his blanky and special bunny have a safe place  to live.

Storage galore. I highly doubt he should ever run out of storage space!


Because of the open shelving on the side of the wardrobe - display options are endless. And I will absolutely take every opportunity to show off his cool things. I can just imagine all of his trophy's up here one day too!


I loved the idea of model planes suspended from the ceiling. Clint supersized the idea and went with a huge RC plan that even has landing gear. I insisted that he cannot play with it until Flynn is old enough to play too. Not sure how long that rule will last! I painted the clouds with ceiling white paint and a sample pot of grey and a cotton tip for the detailing. Simple, cheap and effective.
To add an extra element to the room I had this idea of a light box. And as per usual, I mentioned the idea and Clint is doing all the hard work and bringing it into reality. We are still waiting on the light parts to be delivered, so it isn't in there yet. I will do a separate post when it is all finished.


I know I should have waited till I had all the finishing touches done - and then do this post. But honestly I just couldn't wait, I am so proud of it. And better still, Flynn loves it!

Thursday, February 16, 2012

a little pressie for Lucy

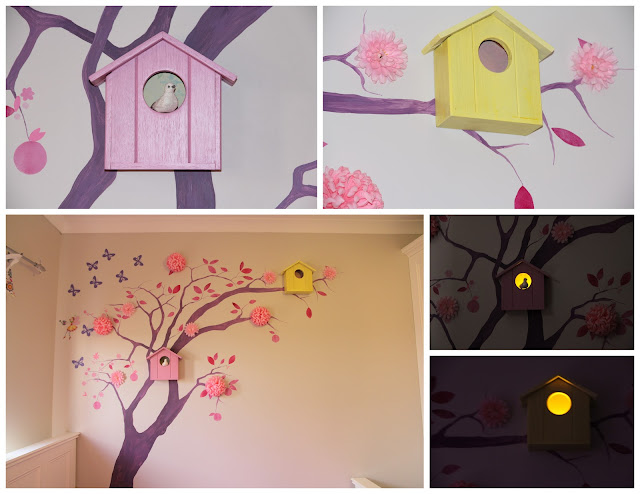
This is just one of the presents that Lucy got for her birthday. I mentioned the idea to Clint and in his handy way just knocked them together one day. I painted them up and put some pretty paper inside to look like wall paper for the birdies. Each roof comes off so at night we drop little battery operated tea lights in and it is a nice alternative to a plug in night light.
So pretty. I still wish it was my room.

Saturday, January 28, 2012

gift for a cheeky girl

Posted by Picasa
Inspired by Pinterest, I spent a few days collecting supplies and then a few days creating.
The little girl who I was making this for is most definitely too cool for standard type 3year old girl gifts. And I have no doubt she already has a good collection of accessories. So I just added a few new ones for her. And this was her reaction.
She has perfect present opening style - Rip into that little sucker!
What a cutie pop


Her birthday is in the height of summer and this year Mother nature put on a show of over 40degrees again. But that didn't seem to phase the kids at all. And the best party tip that I learnt from this party was that no matter what, we NEED to get a bubble machine. It was honestly like a snake charmer for kids. They couldn't get enough of it.

Thursday, December 8, 2011

Day eight - and some serious restraint needed

Day 8 - on our advent and today is "decorate a gingerbread house"
I purchased the kit from Ikea. Even though some might think it is cheating - I honestly don't think the bother of it all is worth it in the end. The fun part is the decorating.


So much FUN
This will probably only last 24hours in our house - but eating it is the 2 most fun thing about the whole task. I will me meditating in the corner so that I don't join in on eating all that sugar. Wish I was a kid again, don't you?

Saturday, December 3, 2011

day 2 and 3

Day 2 on the advent was write a letter to Santa and Day 3 is to play a Christmas game on the computer(easy - that should give us a nice quiet half hour today)

Also on today's agenda is more work on the "BLACK" project


our tree from Day 1's task
Oh and don't you just love a tree decorated with love. Our tree is not symmetrical or organised or have ornaments of just a particular colour scheme. It is however loving decorated by our whole family and that's just how we roll. (I do have one rule though - NO TINSEL! Hate the stuff. Even the thought of it makes me sneeze)

We rescued a glass chandelier this year and made some extra decorations. The lights catch through them at night and sparkle light all around the room.
It was destined for the garbage - but I knew all that cut glass that wasn't ruined still had another life intended for it.

Monday, November 28, 2011

Black is the new black PART ONE

We have moved away from all the beige and decided to do something a little bold in our kitchen. It has been on our "gonna-do" list for some time now and we finally got the balls the go ahead with it. I like having a little bit of time to think about things first. Makes me less nervous about big changes. And going from beige to black is a big change in my eyes.

BEFORE

At first the idea was pure black board wall. Black board paint is a bit expensive and annoying because it isn't a water only clean up task. So off to bunnings for some black paint. The look on the colour assistants face when we told her we were painting a wall black was priceless. It didn't bother us because we are used to people not being able to forsee our visions.

I jumped straight in and started edging

Then Clint took over and did all the proper preparations

And he did all the rest!


How exciting
So we now have one coat on! And stage one is almost complete. A few more coats and then the pantry door is next on the transformation list. Stay tuned for Stage 2..........

Wednesday, October 26, 2011

getting crafty and spooky

We don't really celebrate halloween in this house. I guess thankfully it is not a big tradition in Oz and so it has only just started being pushed by all the supermarkets and advertising. And while i really would never entertain the trolling the streets for lollies, I would like to embrace the festivities with friends etc. So this year I thought I'd have a little dabble at some decorations. They were so cheap to make they would even be great party deco's.
So I started with some 8inch paper lanterns which were $1.50 each and a packet of plastic spiders, also $1.50 and some craft glue. And really from here it is a no brainer, glue as many or as little as you like over the lanterns

as many

or as few as you like
The lanterns could be linked together easily or hung separately wherever you want to decorate. It is raining outside tonight so we have them on my favourite tree inside to show you.
Here is a shot of them with some battery operated tea candles inside
Wouldn't they be dreamy scattered around you garden!

I loved the idea so much I even made a pair of spring inspired ones with colourful paper butterflies. I will definitely be making many more of these for future parties!

As you can probably tell the dark and dodgy pics are by me, whereas the light, clear and arty ones were done by Clint. I might have to make him my official blog photographer. Do you agree?

Thursday, October 20, 2011

candle holder upcycle

 I have recently started enjoying scented candle and have discovered that we really don't have anywhere for them to sit and nothing to catch dripping wax with.

Well rather than look at this as a problem I thought of it as a challenge. I could of course go out and buy something new, but that has never really been my style. So a trip to the local op shop and this pair of candle stick holders came home with me. $3.99 for the pair = BARGAIN

 However the colours were not doing anything for me
So a coat of primer followed by a few coats of shiny white spray paint (at $2.95 a can I will do a lot of projects in white!) After a few days of drying I glued them to the base of some old white mini pie dishes I had (I used them in the days pre-children, but now we never make anything on a small scale). I also glued some felt to the bases to avoid scratching cupboards and give them perfect balance
Voila

Now we have two wonderful candle holders. Although I suspect that they might also be used as candy holders or other ornament displays on table centrepieces at Christmas and the like

Monday, October 10, 2011

week two, october holidays.

What an absolute corker last week was. We finished off with lots more visits with friends and swimming lessons and extreme speed wedding shopping. Unfortunately I ended up sick over the weekend so that has slowed me down a bit but every plan is flexible so nothing to get upset about.

In some extremely rare snippets of spare time I have managed a few little craft activities. This one I will show you today was an awesome treasure find from my local op shop.

$4.99 - how could I leave it there?


A small spray of primer


And then a spray of cool metallic silver


Then attached inside Miss L's wardrobe door

How cute
So all up, approximately 8 dollars later and we have a unique and funky necklace holder for our very trendy little girl.

Tomorrow we have a 2 year birthday party on our agenda and this is what I made for part of the decorations. Abby is her theme and the little miss whose birthday it is, is sweet and cheeky just like Abby so it really fits well. I hope everyone gets some great photos with it.

Thursday, September 29, 2011

School holidays are here

Yesterday was the last day of kindy for term 3 and we are officially into Spring school holidays now. I am making an official pledge to have fun this time. Last time I really felt trapped by all the kid mess and whinging.

I am sticking with my "no tidying the playroom deal". But I am also adding to the list lots of visits with friends both grown up and little ones.

We are kicking off big with Fireworks (care of Bunnings Harrisdale)tonight and then a fab day of gym (the kids think the creche is a special treat) and play date tomorrow with some mummy friend wedding talk on the side. Dad is even getting a special treat of a whole day playing boat building with his BFF - sorry - his mate. Then we are off to the show the next day. I'm pretty sure we will need to follow all of this up with a pyjama day so that we are full of energy for another play date with Miss L's best friend.

I would like to get some sewing done, however I am realistic that it is a complete pipe dream.

Also recently because of a little window of spring sunshine we have managed to venture out to the veggie patch again. We kind of "rested" the beds over winter and added some farm poop and compost to see if we yield better crops this summer.

This is bed number two and we weren't going to really try tomatoes again this year however the garden kind of insisted. They had self seeded and sprouted everywhere. Literally! In the lawn in the garden beds and even in the kids play area which is just white sand! So we transplanted all of the big ones and now have eight seedlings. Not sure which variety is which but pretty sure we will at least have 2 tommy's. Looks like tomato relishes again this summer.
These are both pics of bed number 1. Just from different angles. Clint and the kids surprised me with some more strawberry plants. We have 5 in total now. I still don't think I'll get to taste any as they are too quick at picking them and eating them the second they turn red. Ratbags
Also you can see how during winter i let the kids scatter some seeds that had spilt in my seed container and they turnout out to be lettuces. They have looked after themselves all winter and I am quite impressed at how resilient they are. Only one little brocollini plant survived however. But still that is my best try with them yet.

So far for summer we have planted seeds for corn, basil, watermelon. mini cucumbers and the kids scattered carrot seeds so I will have another interesting harvest.

Also we finally got our tree hat stand from EMPIRE. I love it. It really fits with our quirkiness and the final picture we see out home at in the future. We still have lots to do but now we are one piece of art/furniture closer.
This is Missy moo's tree mural in her bedroom. It also got a spruce up for spring and is now in bloom. We are planning on adding a birdhouse too soon. Another job on the to do list.


Wednesday, September 7, 2011

As promised even though you had to wait.

So after a month of waiting my fabric finally arrived from Spoonflower. I waited that long not because they are slow, but more because I am too tight to pay too much for postage. In the end it was worth the wait and the fabric is just as lovely as I had imagined.
This time I took advantage of other peoples fabric designs.

http://www.spoonflower.com/profiles/potbellybears

http://www.spoonflower.com/profiles/weavingmajor
 I am planning to make a cool globe cushion with the world map one and am still tossing some ideas around my head for the circus people. Maybe a cool satchel?
But this one following has already been put to use
http://www.spoonflower.com/profiles/amy_lou_who
I bought some fab pale grey denim, a red zipper and made some piping with red bias. I had originally only planned one cushion, however in my spirit of trying not to throw out any good fabric I managed to patchwork a second cushion with the leftovers.

I love that we have some more original touches to our decor. Plus the fabric has such great colours in it that they really add some interest and life to our "neutral coloured lives"

Even this little dude approves.
Hope this inpsires you to make something fun too.

"PEACE" out for now.