Showing posts with label craft. Show all posts

Sunday, May 13, 2012

my first EVER quilt.

I was totally inspired my an old school friend - well she isn't old - I guess we both are - we just went to school together a very long time ago. Anyway she cleverly made a quilt for her daughter and it is totally groovy. I had started one months and months ago and had it unfinished in the cupboard for far too long, so last week I pulled my head out of my butt and finished it.

It is a cot sized quilt because I didn't want to over extend myself on my first quilting attempt. It won't be useful in our household so I need a friend or family member to get knocked up with a baby girl so I can gift it!

Quilts, vegie gardens, recipes - Geeze am I a nanna much?

Thursday, April 19, 2012

Friday is for - Potato stamping

Anyone who knows me well, knows that I am a bit of a scrimp when it comes to gift wrap. Wrapping paper can be expensive and in my personal opinion I would rather spend the extra 5 or 8 bucks on the actual gift than on the wrap and card. 
In the past I have used the kids paintings and drawings from craft activities and kindy, brown paper bags with labels made from golden books that I've found at thrift stores, pages from old atlases and butchers paper with iron on transfers that I have found on the cheap. I usually then write straight on the gift wrap my message to the giftee instead of giving a card. Most, if not all, of the ribbon I ever used is recycled from gifts I have received or leftovers in my sewing stuff. One Christmas I drew the ribbons onto the wrapping with a permanent red marker!
This weekend we are attending a kids party and so we have to wrap a present. Because it's school holidays I thought i would double the task as an activity to keep the kids happy. So this morning was all about potatoes and stamping.


 With the addition of a little picture from a 0.99cent golden book and a message I think we've done a good job.

I love when I can make a task that needs to be done into something fun the kids can help with.

Thursday, February 16, 2012

a little pressie for Lucy

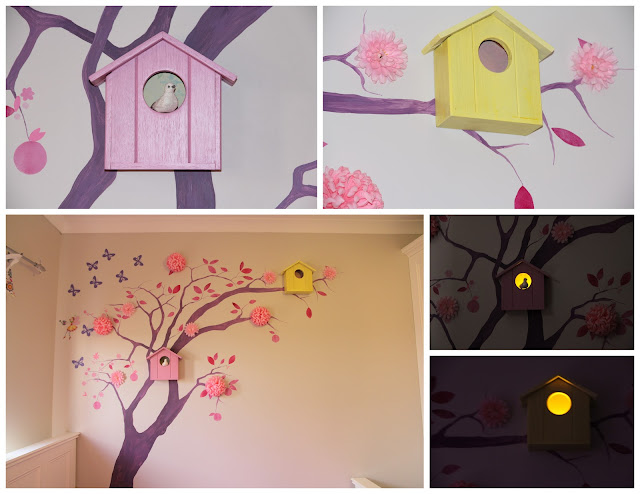
This is just one of the presents that Lucy got for her birthday. I mentioned the idea to Clint and in his handy way just knocked them together one day. I painted them up and put some pretty paper inside to look like wall paper for the birdies. Each roof comes off so at night we drop little battery operated tea lights in and it is a nice alternative to a plug in night light.
So pretty. I still wish it was my room.

Saturday, January 28, 2012

gift for a cheeky girl

Posted by Picasa
Inspired by Pinterest, I spent a few days collecting supplies and then a few days creating.
The little girl who I was making this for is most definitely too cool for standard type 3year old girl gifts. And I have no doubt she already has a good collection of accessories. So I just added a few new ones for her. And this was her reaction.
She has perfect present opening style - Rip into that little sucker!
What a cutie pop


Her birthday is in the height of summer and this year Mother nature put on a show of over 40degrees again. But that didn't seem to phase the kids at all. And the best party tip that I learnt from this party was that no matter what, we NEED to get a bubble machine. It was honestly like a snake charmer for kids. They couldn't get enough of it.

Sunday, December 4, 2011

Day 4

Day 4 on the advent and this mumma is already a bit tired. It could have something to do with the fact that I was woken at 5am by 4 very cute kids that were too stinking happy to be cross at.

Well after all the fun and playtime of a sleepover it was back to business and today's advent task was "make Christmas cookies"
This fits in perfectly with the fact that Lucy will be taking gifts for her classmates at school tomorrow.


These stained glass cookies do look cool - I really hope the kids like them. In all honesty I just hope their parents are impressed cause they were bloomin' fiddly to make and well out of my usual patience ability. All because I stupidly refused to follow the candy cane and card tradition. I wonder if I'll ever learn?

I hope day 5 is something like "give mummy a foot rub" or "make mummy dinner and pour her a wine" or "sit around and do nothing" Who made this advent anyway? Oh yes, crap that was my idea.

Wednesday, October 26, 2011

getting crafty and spooky

We don't really celebrate halloween in this house. I guess thankfully it is not a big tradition in Oz and so it has only just started being pushed by all the supermarkets and advertising. And while i really would never entertain the trolling the streets for lollies, I would like to embrace the festivities with friends etc. So this year I thought I'd have a little dabble at some decorations. They were so cheap to make they would even be great party deco's.
So I started with some 8inch paper lanterns which were $1.50 each and a packet of plastic spiders, also $1.50 and some craft glue. And really from here it is a no brainer, glue as many or as little as you like over the lanterns

as many

or as few as you like
The lanterns could be linked together easily or hung separately wherever you want to decorate. It is raining outside tonight so we have them on my favourite tree inside to show you.
Here is a shot of them with some battery operated tea candles inside
Wouldn't they be dreamy scattered around you garden!

I loved the idea so much I even made a pair of spring inspired ones with colourful paper butterflies. I will definitely be making many more of these for future parties!

As you can probably tell the dark and dodgy pics are by me, whereas the light, clear and arty ones were done by Clint. I might have to make him my official blog photographer. Do you agree?

Thursday, October 20, 2011

candle holder upcycle

 I have recently started enjoying scented candle and have discovered that we really don't have anywhere for them to sit and nothing to catch dripping wax with.

Well rather than look at this as a problem I thought of it as a challenge. I could of course go out and buy something new, but that has never really been my style. So a trip to the local op shop and this pair of candle stick holders came home with me. $3.99 for the pair = BARGAIN

 However the colours were not doing anything for me
So a coat of primer followed by a few coats of shiny white spray paint (at $2.95 a can I will do a lot of projects in white!) After a few days of drying I glued them to the base of some old white mini pie dishes I had (I used them in the days pre-children, but now we never make anything on a small scale). I also glued some felt to the bases to avoid scratching cupboards and give them perfect balance
Voila

Now we have two wonderful candle holders. Although I suspect that they might also be used as candy holders or other ornament displays on table centrepieces at Christmas and the like

Monday, October 10, 2011

week two, october holidays.

What an absolute corker last week was. We finished off with lots more visits with friends and swimming lessons and extreme speed wedding shopping. Unfortunately I ended up sick over the weekend so that has slowed me down a bit but every plan is flexible so nothing to get upset about.

In some extremely rare snippets of spare time I have managed a few little craft activities. This one I will show you today was an awesome treasure find from my local op shop.

$4.99 - how could I leave it there?


A small spray of primer


And then a spray of cool metallic silver


Then attached inside Miss L's wardrobe door

How cute
So all up, approximately 8 dollars later and we have a unique and funky necklace holder for our very trendy little girl.

Tomorrow we have a 2 year birthday party on our agenda and this is what I made for part of the decorations. Abby is her theme and the little miss whose birthday it is, is sweet and cheeky just like Abby so it really fits well. I hope everyone gets some great photos with it.

Wednesday, September 7, 2011

As promised even though you had to wait.

So after a month of waiting my fabric finally arrived from Spoonflower. I waited that long not because they are slow, but more because I am too tight to pay too much for postage. In the end it was worth the wait and the fabric is just as lovely as I had imagined.
This time I took advantage of other peoples fabric designs.

http://www.spoonflower.com/profiles/potbellybears

http://www.spoonflower.com/profiles/weavingmajor
 I am planning to make a cool globe cushion with the world map one and am still tossing some ideas around my head for the circus people. Maybe a cool satchel?
But this one following has already been put to use
http://www.spoonflower.com/profiles/amy_lou_who
I bought some fab pale grey denim, a red zipper and made some piping with red bias. I had originally only planned one cushion, however in my spirit of trying not to throw out any good fabric I managed to patchwork a second cushion with the leftovers.

I love that we have some more original touches to our decor. Plus the fabric has such great colours in it that they really add some interest and life to our "neutral coloured lives"

Even this little dude approves.
Hope this inpsires you to make something fun too.

"PEACE" out for now.

Monday, June 27, 2011

cheap and cheerful

The kids playroom has had some framed posters in it that were purchased by my hubby back in his bachelor days. They are pictures of Muhammed Ali and while not aggressive, they just didn't suit the mood of the room they are in. But we also don't have the cash to allocate to anything expensive or flashy as a replacement.Clint had made the frames and they were perfect for the decor in the rest of the house and in good nick so really we just need to re fill them with something more suitable. This is what I came up with for under $16 buckeroos!

Technically it was under $12, however I had to purchase an embroidery hoop, but luckily I will use it some time in the future no doubt so it will pay for itself 10 fold. All it is is 2 metres of ikea fabric at $AUD3.95 a meter, and 4 lots of embroidery thread in different colours at $AUD0.99 each. I followed the lettering on the first fabric for each of our birthdays, and on the little house fabric we each picked a house and I copied part of the outline and gave them house numbers - again the numbers of our birthdays. It is not over the top colourful so hopefully it will be acceptable for that room for many years to come.

Friday, May 27, 2011

One for the boy........

As a crafty mum with the "pigeon pair" of kids (one girl one boy) I quickly realised how easy it was to make and create beautiful stuff for girls and the boys get a little bit left behind. Thankful because of a great group of people i stumbled across an amazing tutorial to make something for Master F.
Honestly, if you are at all crafty or have even the smallest sewing bone in your body you need to check out this blog. Totally inspiring http://punkinpattern.blogspot.com/

So with that I made this. It is perfect him. It can hold 2 nappies + wipes + a jumper and even still has room for some cars or other toys. Plus as he grows and no longer needs nappies etc it will fit his water bottle and snacks etc too.
He looks so grown up with his satchel. Dang, I hoped he stay a bubba forever.


Sunday, April 17, 2011

DIY cupcake pick decoration

A very good family friend is turning 2 this month and I offered to make these for her party. Miss S' mum is making and ultra cool butterfly cake so I thought these would keep with the theme for some extra cupcakes. They are super easy to make. First using a cutter punch (or precut shapes if you have them) cut double the amount of circles from your chosen card.
Next I like both sides to have something on them so that no matter what angle a photo is taken on the day a little something is seen. So on half of my circles I stamped a little message


Next I glued on some butterfly embellishments that i found at the craft store. Then I folded back the wings of a second butterfly and glued only the body strip so that the wings stood up like so:
the next step was to assemble the picks. So I place one stamped circle face down and glued the back making sure the message was the right way up first.
Then pressed a butterfly circle on top and used some clips to pinch the base closer together. The drying time would all depend on the glue you use, however i used a diamond glue so it was dry very quickly
And here is the end result.
I hope you enjoy making them as much as me. I keep them very simple as they usually end up in the bin within seconds after the candles are blown out. But they really help keep the party theme alive and keep me out of the kitchen on the day.